Ko-kun Bhaley, Yu-shang Bhaley , Logo-Momo (3-in-1)
I’ve been getting a number of requests for different bread recipes and I thought it might be easiest if I rolled them all into one recipe. Three different styles of bread from one standard dough mixture – really, it’s as easy as that.
Once you get the basics down, you can start improving and personalizing your own style and brand of bread. Experiment with different ratios of whole-wheat to white flour, different shapes and sizes, … practice makes perfect – there’s nothing else to it. I like to make Kokun with plain regular white flour and for Yu-shang or Logo-Momo, I mix some whole wheat with regular white flour. 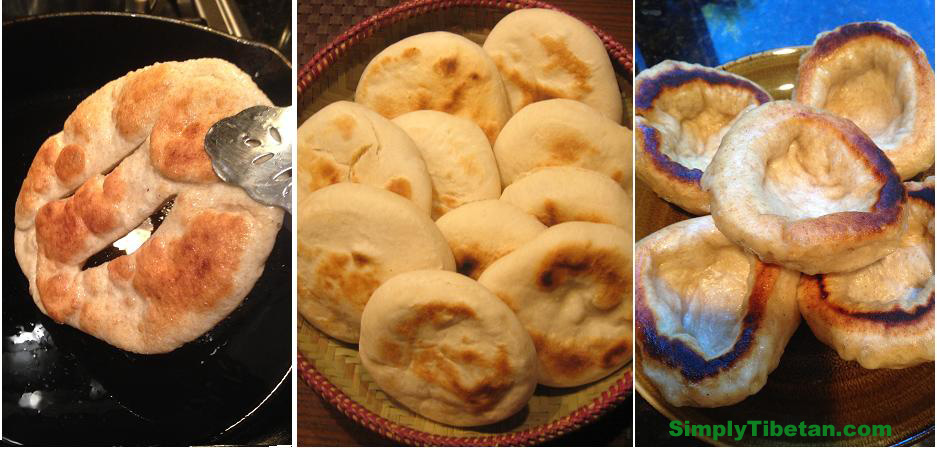
If you like sweet Kokun bread, then add some sweetened condense milk when making the dough – this softens the bread and also give it sweetness. Others say one should add 2/3 Tablespoons of yogurt to the dough to have softer bhaley but my family prefers the harder, chewier bread, so no condense milk or yogurt in our bread! But you should out different ways and see what you and your family like.
Basic Bread Dough
4 cups flour
1 teaspoon Baking Powder
1 teaspoon Yeast Powder
1 teaspoon Salt
1 Tablespoon Vegetable Oil
Approx 1 ½ cup Water
Place all the ingredients in a large bowl. Make a well in the center and add the water little by little, mixing it into the flour, until you have one big lump of dough. Stop adding any more water and continue kneading until the dough is firm and smooth. Place the dough ball in a lightly oiled bowl, cover with a clean kitchen towel or cling wrap and allow to rise for 30 minutes or up to few hours (use less yeast if you are going to leave it overnight or longer than 2 hours).
Ko-kun Bhaley
We make Bhaley Kokun quite often – once you have the hang of it, its really easy and quite delicious. So delicious that my son will usually take one straight off the pan, slice through sideways, smear some butter in the middle and enjoy it – especially if ther is a cup of hot Bo-cha to have with it. (Left over ko-kun bhaleys are great for Kok-sha – but this will have to wait until another time.)

Ko-kun Bhaley Preparation:
Divide the dough into golf ball size pieces. Roll the dough piece in the palm of your hands to make it nice and round. (this helps shape them round after)
Take one round dough ball, flatten it with you palm, and shape it with a rolling pin into a 4 – 5 inch flat round shape. (If the dough sticks to the rolling surface – a sprinkle of flour on the surface will help.)
Place the rolled bread on a hot griddle. Its important to keep the griddle at a medium-low heat setting – with practice you’ll figure what’s best for your type of griddle and stove. But if its too hot, it’ll burn and if its not warm enough, then it’ll just take way too long. Cook on one side till little bubbles form, then flip it over and let the other side cook. It will start puffing up slightly, then turn over and let both sides brown nicely.
Yu-shang Bhaley
I don’t know why I don’t make Yushang bhaley more often. Its so good. When I think of Yu-shang bhaley, I think of picnics. Growing up in TCV school, over summer holidays, we would go on overnight picnic trips to Kangra river, Triund, or Ri-Nyi-Gyab-Chu (BehindTwoMountainsRiver) .. and our picnic grub would be Yu-shang Bhaley & Shogog Khatsa. Tired from all the swimming, walking, … the slightly oily, giant size Yushang Bhaley, churned out in the hundreds from the TCV common kitchen and little serving of Shogog Khatsa with it, is a taste that still lingers in my mouth. Here’s a little guide for you to make them for your family.

Yu-shang Bhaley Preparation:
Divide the dough into golf ball size pieces. Roll the dough piece in the palm of your hands to make it nice and round. (this helps shape them round after)
Take one round dough ball, flatten it with you palm, and roll it flat with a rolling pin into a 6-7 inche flat round shape. (If the dough sticks to the rolling surface – a sprinkle of flour on the surface will help.) With a sharp knife, make one or two 3-4 inche straight cuts in the center of the flat dough. This lets the dough expand and cook evenly.
In a large skillet, heat about ½ cup of oil – covering the base of the skillet. Slowly lower the flat bread into the skillet. Once it forms bubbles, flip it over and let the other side cook. Cook each side until nicely golden brown. The bread gets done very quickly so keep a watchful eye. Add more oil to the skillet as needed.
Logo-momo
Logo-momo is a hearty and unique bread. As a child I was never too fond of it but now I love its texture and simplicity. You really don’t need much of anything for this bread – and its so quick and easy to make. I have an aunt who used to make this for me when I visited her sometimes. She lived by herself near the Kora in Dharamsala, in a small one room apartment with a small kitchen on one side of the room with a single small stove. She would cook the meat and vegetables first in the pan and then push them to the side to make room to cook the logo-momo on the side, in the same pan. It was delicious. After the meal, she would take out her snuff and her infamous handkerchief – and then conversation would begin and I would be treated to all the gossip and the wonderful tales and stories of days bygone – she had an incredible memory and a real knack for telling stories and I never did mind hearing them again and again.
![]()
Logo-momo Preparation:
Divide the dough into pieces slightly bigger than golf balls.
Take one dough piece and shape it with both your hands into an igloo shape. Use your two thumbs to push in the middle and your other fingers to hold the igloo shape.![]()
(You need a large skillet with a cover for this. )
Heat the skillet, add 2 Tablespoons of oil and let it cover the entire surface of the skillet. Place your igloo shaped bread on the hot skillet and let the bottom surface get to nice golden brown. At this point, take a cup of hot water, add it to the skillet and cover it up. Let it cook until most of the water has evaporated. Now, take of the cover, turn down the flame and let the rest of the water evaporate completely. Once its evaporated, your bread is done. 
9 comments on “Ko-kun Bhaley, Yu-shang Bhaley , Logo-Momo (3-in-1)”
Please leave a comment. Thank you.

Top Posts & Pages


Saw your site mentioned in Tibet Watch (Winter 2019). Looking forward to trying my hand at Ko-kun Bhaley and Yu-shang Bhaley. Thank you for posting pictures of the process and end result.
I’m going to try it tomorrow for our Losar Lunch along with Sepen and other Tibetan dishes. I also made Chaang…which turned out good and sweet.
BTW my husband is half Tibetan, I’m not.
I will let you know how it turns out. Thanks for the recipes. 🙏🙏
to make the dough of logo momo is baking soda required or not?
I tried your recipe for weshang bhlaey, and it came out perfect! Thank you so much
Thank you! I have been looking for authentic Tibetan cooking for so long… Very useful
I meant to say, your recipes are far more interesting! 🙂
Hey! Thankyou for the amazing recipes. It was pure pleasure to read all the recipes since we cook similar food but then are way more fascinating and interesting! I Have been lately reading and learning about different kinds of bread in himalayan region and am so intrigued by the recipe of Logo Momo. We make both the other two recipes but Logo momo was revelation and speacially the techinique. Its kind of steam baking and first browning the top and bottom is very clever. Let me tell you why: I dont own an oven and thus struggle with bread recipes. In my effort innovate some clever skillet bread recipe I ended up learning and understanding the science of baking. I am definitely trying out this recipe for my tomorrow morning breakfast 😀
I live in Dharamshala but belong to Lahaul 😉
Yes, you can put all the ingredients in a large bowl, add spoonful oil, mix slightly and start adding water to make into dough.
in your recipe you listed 1 tbs of vegetable oil,then in the dough preparation you said mix all the ingredients together. does that mean that the vegetable oil is mixed along with the dry ingredients before you pour water in it? thanks.